
Note: If your serial number contains a “0” for the 3rd digit, you’re in the right place. If the 3rd digit is a “1” please see out “Network installation of SOLIDWORKS” guide.
Before we get started – You’ll need the following:
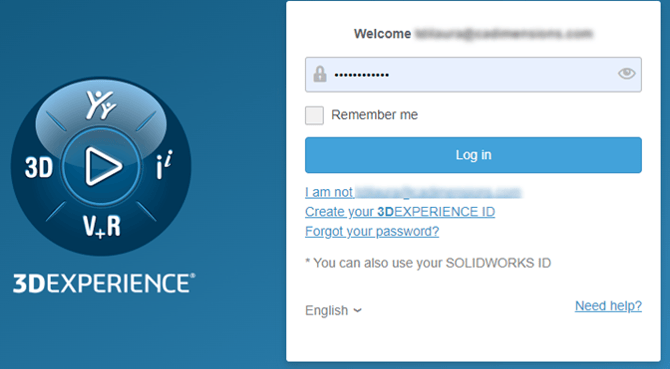
• SOLIDWORKS Login or 3DEXPERIENCE Login. If you do not have one, check out our post on Creating a SOLIDWORKS Account.
• Verify System meets SOLIDWORKS requirements. https://www.solidworks.com/support/system-requirements
• Local Administrator account access.
Downloading Installation Files
Important Note: Ensure you have at least 30GB of free HDD space. The installation files can be up to 16GB based on the serial number you enter.
- Log into the SOLIDWORKS Support Download page https://www.solidworks.com/support/downloads

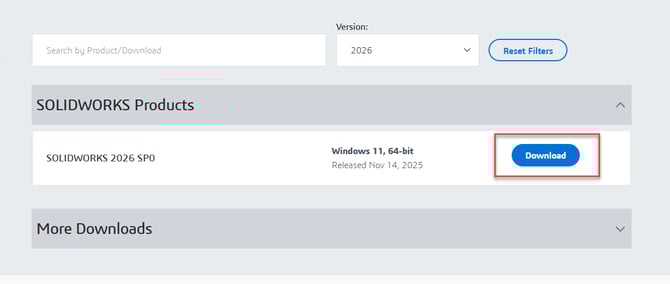
- Scroll down (if necessary) and select Download, on the version you wish to download. If you need a previous version, you can select the dropdown. SOLIDWORKS allows downloads for the previous 3-4 major versions. If you need a version older than that, contact us to request it.
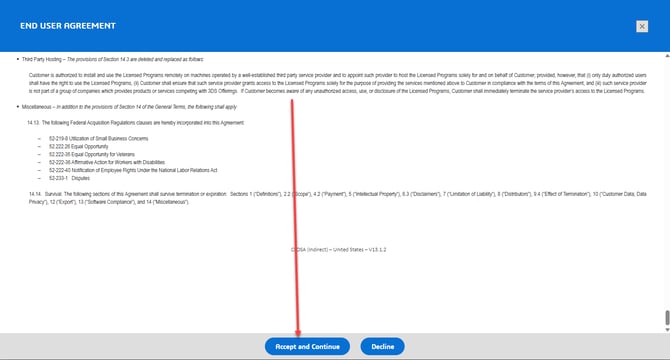
- Scroll to the bottom and accept the Customer License Agreement
- Locate SolidWorksSetup.exe (This will typically be in your Windows “Downloads” folder) Right click on “SolidWorksSetup.exe” and choose “Open” or Double click to launch

- Choose where to extract the files. Be sure to check “When done unzipping open:” to auto launch the Installation Manager

- Choose “Download and share all files”
We are downloading a full copy of the SOLIDWORKS DVD for this installation and all future installs of this version. You can share this download with others at your company

- Summary: Confirm the download location, you can select “Change” to adjust the location. Accept the “License Agreement” If all looks correct “Download Now”
Starting the Installation
- To start the installation after the download has completed, go to the “Download to:” location chosen in “step 9” above. Looks for “Setup.exe”, right click and choose “Run as Administrator”.

- Specify the installation type: We will be covering “Install on this computer” in this guide.

- Enter your Serial Number(s) for SOLIDWORKS and any other products. NOTE: if the 3rd digit of your SN is a “1” STOP and use the Network Installation Guide

- OPTIONAL: Click “Change” to adjust any of the following areas.

- Accept the terms of the License Agreement, then select Install

- Check “I want to activate my SOLIDWORKS product now” and select “Next”
-
Install Complete: If you experienced any failure during the install, please “Save Logs for Support” and create a new Support Case with the CADimensions Team
-

Activation
When you launch SOLIDWORKS for the first time you will be prompted to activate you license
NOTE: if your licenses are currently active on another computer you will not be able to activate. “Activation count exceeded will be displayed”
1. Open the newly installed version of SOLIDWORKS from the Windows Menu.

SOLIDWORKS Activation will automatically appear on first launch.
2. Check “I want to activate my SOLIDWORKS product now” and select “Next”
3. Activate: “Select All” serial numbers, choose “Automatically over the Internet” and enter your “Email”
4. Review activated license
5. Read and accept the SOLIDWORKS License Agreement
6. Finished – Your SOLIDWORKS should now be open and ready for use
Not working like it should?
If things didn’t go as planned when registering your account, please contact CADimensions Technical Support for further assistance.
If you have an existing case, please contact the Application Engineer you are working with; otherwise submit a new case online.